Just about everyone uses Gmail today, but we’ve got to be honest – most of us don’t use it like a boss.
Gmail has so many awesome hacks that can save small business owners time, money, and effort. Some of them are a little bit hidden, but that makes it all the more worthwhile once you know how to find them. Bonus: after reading this article, you’ll look like a genius to your clients, since most of them are unaware of these hacks.
Here’s our guide to 10 life-saving Gmail hacks for small business owners:
1. Undo a Sent Email (Yikes!)
We’ve all been there. That moment of heart-stopping fear when you realize that you just hit “reply all” and now that dissatisfied customer is about to read what you really think of them. Or the embarrassment of sending an email without the attachment after you’ve said “please see attachment”.
But Gmail knows you, and it’s got your back. Gmail has had an ‘undo send’ feature since 2015, and now it’s turned on by default in every Gmail account. Here’s how it works:
On Android:
Look at the bottom right of your screen for the blue “undo” button. Click the button. Your email will magically disappear from everyone’s inbox. Phew. Disaster averted.
On a PC or Laptop:
Pretty much the same drill. Look down at the bottom left of your screen just after you send your email. You’ll see a short message saying “Message sent.” Next to that, you’ve got an option to “Undo” or “View message.” Click “Undo”, as fast as you can.
Now feel the relief.
There’s one more thing you need to know. Although “Undo send” is switched on by default, Gmail only gives you 5 seconds before the option disappears. That’s not much time to realize you’ve made a terrible mistake and call back the email that could destroy your business.
So don’t delay – go to your Gmail settings and scroll down to the “Undo send” option.
Now increase the cancellation period to 30 seconds (that’s the maximum).
High five!
2. Write Emails 10 Times Faster
If you’ve been spending a lot of time writing messages on your phone, you can sometimes feel a wave of frustration when you hop onto Gmail and have to write complete words and sentences out all by yourself. What happened to a machine filling in the blanks for you?
Have no fear, Gmail is here!
Gmail’s “Smart Compose” feature works a lot like predictive text. It uses machine learning to get to know the phrases you type most often, and to recognize the context when you’d use them. Then, as soon as you start writing the phrase, you’ll see some text appear in gray to complete your sentence.
All you need to do to accept the suggested text is to swipe your finger across it, if you’re using your phone, or to press “tab” if you’re on a laptop or desktop.
Turning Off “Smart Compose”
Like “Undo Send”, “Smart Compose” is enabled by default on all Gmail accounts on laptop, Android, and iOS. However, you can turn it off if you want to:
- On a laptop or desktop, go to “Settings”
- Go to “General” and scroll down to “Smart Compose”
- Select “writing suggestions off”
- On a phone, go to “Settings” on your Gmail account or app
- Select your account
- Find “Smart Compose” and turn it off
Wait, It Gets Better
Gmail doesn’t just use stock phrases; it watches your writing style and uses it to personalize the style of its text suggestions. If you don’t want Gmail to personalize it and you’re happy with generic text, you can turn personalization off too (although honestly, we can’t see why you wouldn’t want personalized suggestions).
You can only turn personalization off from a computer, but not a phone or tablet:
- Visit your “Settings” again
- Under the “General” tab, scroll down to “”Smart Compose personalization”
- Select Personalization on or Personalization off
3. Turn a Gmail Message into a To-do List Item
In an ideal world, you’d reply to every email as soon as you get it. But in an ideal world, potato chips would be good for you, too. So let’s get real: sometimes you need to leave an email and get back to it later.
Perhaps you need a bit more time to think about your response, or perhaps you’re watching the new Aladdin movie right now (whoah).
Gmail doesn’t care what your reason is. It’s just here to help. That’s why it’s offering an awesome combination of emails and task management, so you can add an email to your task list and get a reminder to deal with it later.
Note: This is only available when you use Gmail on your computer.
Here’s how to add an email to your Google Tasks list:
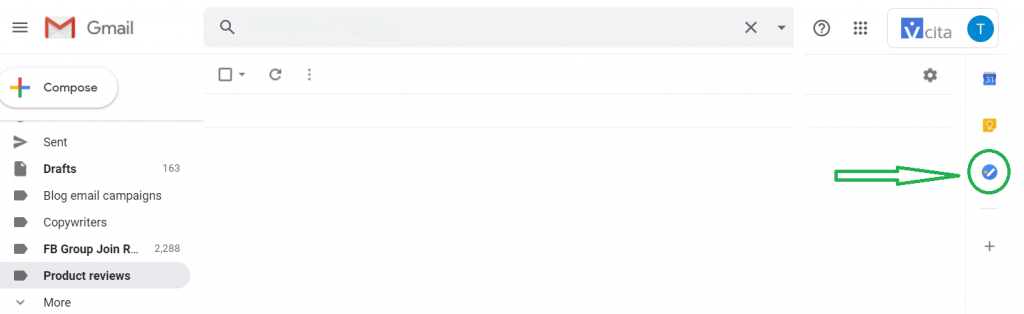
- Go to your Gmail account
- Click the blue “Tasks” icon on the right-hand side of your screen
- Now find the email that you want in your inbox, or any other email folder. Your tasks window will stay open patiently the whole time.
- Drag the email into your task list
- Alternatively, you can click on the email you want, then go to the “More” drop-down menu and select “Add to tasks.”
Once you add an email to the task list, it creates a task with the same name as the email subject line. You can edit the task name, add more details and sub-tasks,and change the date and time for the task.
Best of all, Gmail automatically shares the task with all your Google apps, including your calendar, so you’ll get a reminder right when you need it!
4. Add Labels to Color-code your Inbox
You probably already know that Gmail lets you organize your emails using labels. Labels are an inspired way to keep your emails streamlined – but only when you use them in full color. Here’s how it works.
Create a New Label
Look on the side of your Gmail account for the “Create new label” option. It’ll be below your Compose button, but you might have to click “More” to open up the right menu.
Choose a name for your label
Try to keep it short, like “Sales.” You can nest labels underneath each other to keep things tidy, but that might mean that the label won’t show up clearly.
Once you’ve created the label, there are 2 ways to apply it to your emails.
Create a filter by clicking the arrow at the end of the search bar. You can filter emails by email address, subject line, keyword, and more.
Or, attach a label to a single email. Gmail will apply the label to every email you get from the same address.
Add Glorious Color
Here’s the clever part:
- Once you’ve made your labels, hover the mouse over the label name in your side menu.
- You’ll see 3 dots appear next to the label.
- Click on the dots to open the option of adding a color. For example, you might want to mark all emails from sales agents in bright red, so they show up clearly among the clutter of your inbox.
Now it’ll be easy to spot every sales agent email at a glance. This trick is especially useful if you’re trying to keep track of a few different projects at once.
5. Create Canned Responses to Save You Hours of Work
Gmail’s canned responses are email for the lazy – but we won’t judge!
They are ideal for business owners who have to answer the same questions again and again. Instead of giving in to your desire to type a snarky reply, just save your canned response for future use.
To enable canned responses:
- Open “Settings”
- Click on the “Labs” tab
- Enable “Canned responses”
Now you can save changes, and start creating your canned responses.
It’s totally simple:
- Just start writing a new email, like normal
- Instead of sending the email, look for the down arrow at the bottom of the message screen
- Click the arrow, and select “Canned responses” and then “New canned response.”
- Give your canned response a name, then click “Okay”
Now you can pull your canned response out of your hat whenever you need to save time – or your sanity!
Here’s how to insert your canned response into a new email:
- Click “Compose” to start a new email.
- Scroll down to the bottom of the email and click on the down arrow that’s next to the trash can icon
- Hover over “Canned response” until the list of saved responses opens. Then just click on the one you want, and it’ll appear in the body of your email
- You can add a personalized closing to the email, like “Best wishes”, or just send it as is.
No one will ever know that you didn’t write that email from scratch, especially for them. Save your time, save your stress levels.
6. Get Offline Access to Gmail
We’re always online, right? Except when we’re not. Think of the time you spend on the commuter train without wifi, or when there’s a blackout in your building and you can’t respond to any of those urgent emails piling up in your inbox.
Getting offline access to Gmail can be a huge timesaver. Here’s how to do it.
First, you need to enable offline mode. Go to “Settings” in your Gmail account, and click the “Offline” tab.
Now choose your offline settings, like how many days of messages to sync, whether to include attachments, and where to store messages on your computer after you log out. Once you’re done, hit “Save changes.”
Note: when you’re offline, your replies aren’t sent immediately. They’ll be stored in your outbox and sent as soon as you go online again.
7. Send Emails from a Different Address or Alias
In the real world, having an alias makes you sound like a master spy.

But in the business world, having an alias email on your Gmail account allows you to save time. When you have an alias email, or any different email address set up as part of your Gmail account, you can flip between them in the blink of an eye, making it quick and easy to run a mail merge or to switch between customer support emails and sales emails.
How to add another email address to your Gmail account:
- Go to “Settings,” then open “Accounts and import” or “Accounts”
- Find the “Send mail as” section, and click on “Add another email address.” Make sure that you have access to this email account, because you’re going to need to verify it in a minute.
- Now enter the name and email address you want to use as your alias, check the “Treat as alias” box, and click “Next Step” to send a verification.
Here’s where you need to go into your other email address, find the confirmation email you got from Gmail, and follow the instructions to verify it.
Now you can choose your “From” email address whenever you send an email. Just click “Compose” to start writing a new email, like you normally do. If you click inside the “from” field, you’ll see that all your alias email addresses appear, so you can select which one you want to use this time.
Hey, presto, your Gmail has a double life!
7. Delegate your Email Account While Maintaining your Privacy
Here’s the thing: you don’t have time to reply to all those hundreds of routine emails you get every day. You’re ready to delegate that stuff to an administrative assistant or something similar. But ain’t nobody got time to forward dozens of emails a day to somebody. And you aren’t about to give anyone access to all your Google settings.
Gmail to rescue once again! There’s another way. You can delegate your email account to somebody. This doesn’t mean that they can see inside of your inbox (eww). Instead, your emails will show up in their inbox, so that they can:
- Read and reply to your emails
- Delete emails
But they cannot:
- Change your Google password or any of your Google settings
- Get in to your other Google tools
- Have Google chats
When your delegate replies to emails for you, their email address will show up in the “sent by” field, as “Sent by: [email protected]”
Here’s how it works.
Turn on Gmail delegation
- Sign in to your Google Admin console using your administrator account, not your personal email address.
- Now go to Apps, then click on G SuiteGmailUser settings.
- Look for the option of “mail delegation” and select “Let users delegate access to their mailbox to other users in the domain.” If you have a number of organizations, you can choose which one to enable mail delegation for.
- Click “Save.”
- Add a delegate
- You can only do this from your computer, not from the Gmail app.
- Go to Settings, then click the Accounts and Import or Accounts tab.
- Scroll to the “Grant access to your account” section, and then click “Add another account.”
- Put in the email address of the person you want to add as a delegate.
- Click Next step” and then “Send email” to send a confirmation email to your new delegate. They have 1 week to confirm the invitation before it expires.
And that’s it! Now you can sit back and let someone else deal with the Gmail hacks and send repetitive emails for you. More time for you to binge-watch on Netflix … er, that is, to grow your business.
9. Pick a Gmail Theme You Love
Let’s face it, we don’t always want to be at work, so anything that makes it more fun is a plus. Gmail lets you choose your theme, which gives you a special background image. You can have literally anything – if you don’t like the themes Gmail has to offer, you can use one of your own photos, as long as its larger than 2560 x 1920 px.
How to choose your Gmail theme
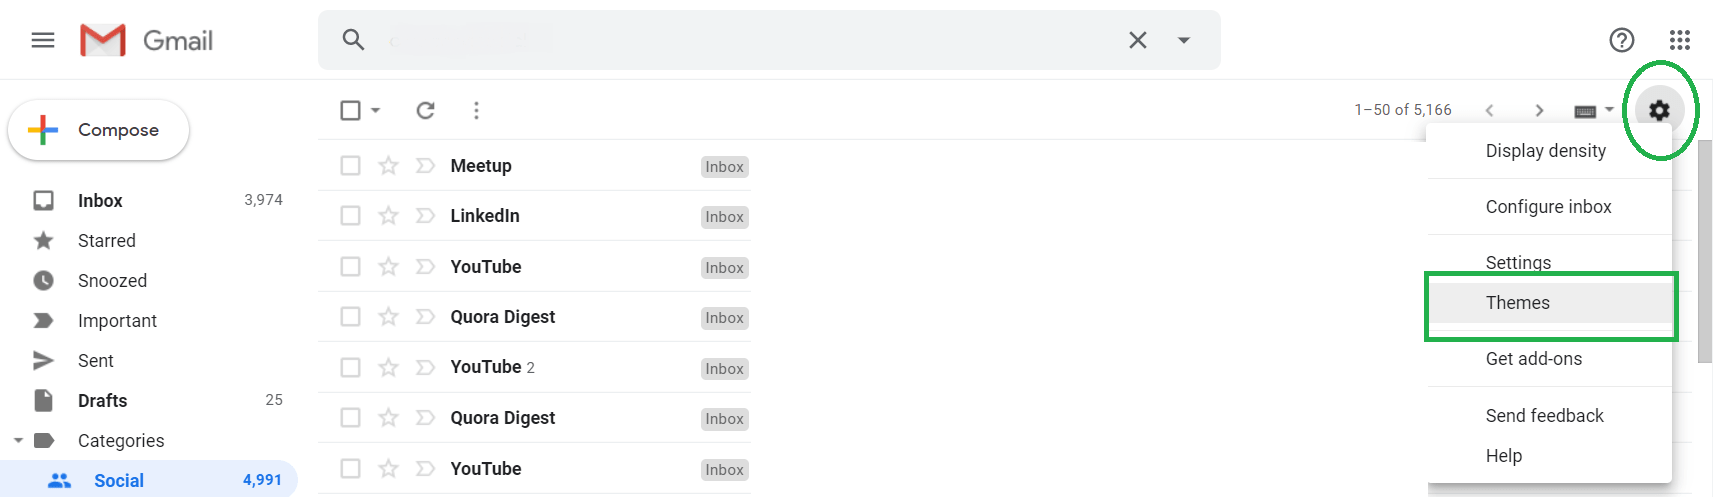
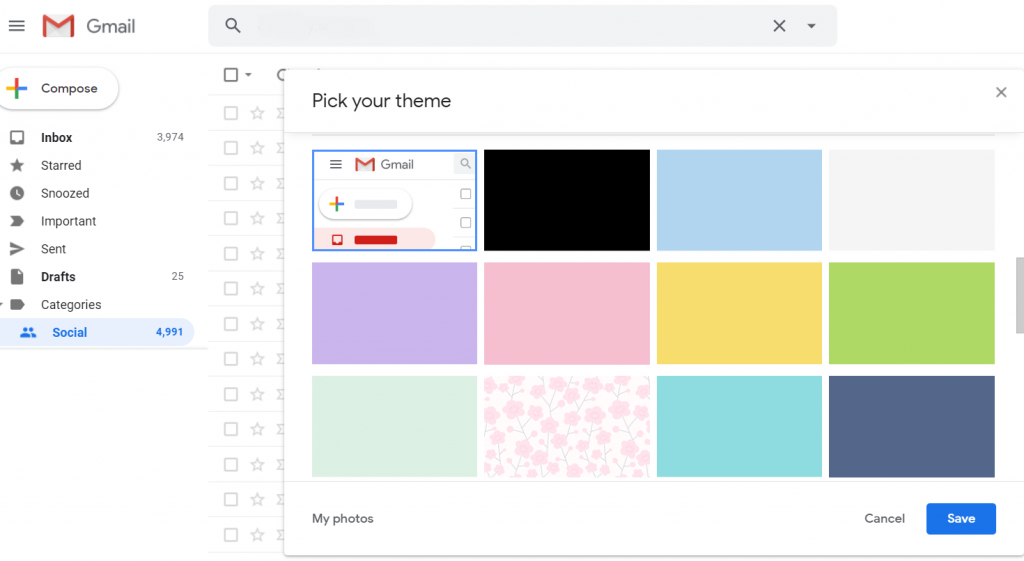
- Click the “Settings” button, then go to Themes. You can choose a Light or Dark theme, or browse through all the options till you find the one you like
- If you don’t like any of the themes (my, aren’t you picky!) then you can use your own photo. You need to upload the photo you want to photos.google.com first, in a separate tab
- In the bottom left of the screen, click “My Photos” and choose a photo
You can edit your photo or theme by clicking Text Background, Vignette, or Blur. Now save your theme. You’re done!
Set Up an Auto-Responder While On Vacation
When you say you’re taking a vacation, mean it. Disconnect. It’s OK. We give you permission.
Let your customers and connections know that there’s a reason why you won’t be replying to your emails with Gmail’s out-of-office auto-responder.
You can set your auto-responder to say whatever you like, from “I’m on the beach and you’re not” to “I’ll be out of the office until X date, please send urgent inquiries to my assistant Katie.” Your call.
Here’s how to get it done:
- Open “Settings”, then scroll down to “Vacation responder”
- Click “Vacation responder on”
- Enter the dates you want your vacation responder to be active
- Write the subject and message of your autoresponder
- Choose whether your autoresponder should be visible only to your contacts
- Click “Save changes”
That’s it! Time to pack your bags and hit the beach.
Now you’ve got your Gmail under control, time to sit back and let it run itself. With these Gmail hacks, work can be faster and a whole lot more enjoyable.